

The Barcode Application
(only Demo guide available)Installing
To install the Barcode application copy the file Barcode.app from the demo disk to your file system. If you are working on a network copy it into a directory, which is exported and mounted on every system.
Getting Started
Double-klick on the item Barcode.app in the Workspace Manager. The Main Window and the Preference Panel will apear.
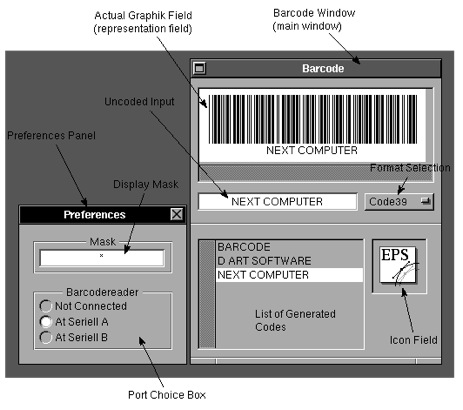
If you have a barcode wand installed select the serial port in the Preferences panel. The Display Mask field lets you enter hyphens, dots, slashes as you like for your individual display. The Popup menu Format Selection in the Barcode Window shows, which code tables are available, e.g. UPC, EAN, Code39, etc. Choose the format you want to create codes from. For example, to create graphics as NeXT uses them for their serial numbers, choose Code39.
Generating Barcode Graphics
In the text field Uncoded Input you can now type in the number or string to create a barcode graphic from. Simply press return and you'll get a small PostScript graphic in the Actual Graphic Field (representation view), and the corresponding icon in the Icon Field. In the full version of Barcode you can grab this icon and drag it over some document which supports importing of EPS graphics. For example you can send a barcode graphic via email, or create documentation with WordPerfect. Unfortunately the 2.0 version of WriteNow does not support to drag and drop graphics.
Services of Barcode.app
In the Services menu of all NeXTstep applications the item Barcode appears and shows you the submenu Define. Choose this item in any program if you want to see the corresponding barcode graphic of a selected string. In the original version there is a second service titled Replace, which allows you to replace a string with a graphic. This feature may be used with WriteNow.
Generating Series of Barcodes
Klick on the Generator… item in the main menu of the barcode application. The Generator Panel will apear.
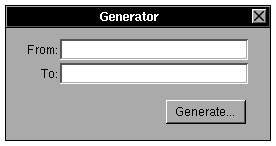
Type in the limits of numbers you want to create barcodes of.
Please notice: If you use the Code39 which allows letters as well as numbers, please avoid inconsistency; you may generate a series of barcodes from A10 to A20, or from 10A to 11C; but you can't use limits like A10 and 20B.
Using the Graphics in other Applications
Since the Barcode application creates Standard PostScript files you can use these graphics in every application which supports this data type.
Differences to the original version
As mentioned earlier you can drag the icon from the Barcode main window into other NeXT applications. You can't do this with the demo version.
The original version creates real PostScript files, which you can copy, duplicat, move, or change through the application Icon, Pixel Magician or Preview; the demo version won't do so.
The List of Generated Codes is temporarily. It doesn't allow you to save these codes, like the original version does.
And you have the service of replacing strings by a barcode graphic via interapplication communication. The original version provides one more item in the services menu.
Available Codes
We supply translation tables for several encodings, for example some variations of EAN (European Article Number), UPC (Universal Product Code), Code39, C25, and some special variations. Other tables will be available on demand.
Hardware and other Products
We also offer barcode wands which are connected to your NeXT-Computer via the serial port. Barcode wands are even available as portable pen-style versions which can store thousands of barcodes. You might want to use these to manage your inventory. For instance our Office Management System Viva! allows you to keep track of your inventory using the Barcode application.
d'ART Software GmbH